Wednesday, November 30, 2011

Christmas Tree Handprints

This is one of my all time favorite projects I have done with my kids. It just so happens to be an all time favorite Christmas present too! It's really easy and turns out just adorably!

Here is what you will need:
1 piece of white paper (large) (or a canvas-which is what I used- you can get them for pretty cheap)
Green, yellow and brown paint
1 kid willing to get ooey and gooey

make a Christmas tree out of hand prints
Paint your child's hand with the green paint- make one row of 4 hand prints
make a Christmas tree out of hand prints
Next paint your child's hand again and make a row of 3 hand prints

make a Christmas tree out of hand prints
Then make a row of 2 hand prints on top of that
make a Christmas tree out of hand prints
Lastly, 1 hand print on the very top
make a Christmas tree out of hand prints
Use the brown paint to make a stump and the yellow to make a star on the top. (Have your child autograph the tree with the year to mark the date)
make a Christmas tree out of hand prints
These make GREAT presents and they are always adored by grandparents. While making the tree I thought to myself....hmmm, what if I traced a circle really lightly in pencil and did the same thing?
make a wreath out of hand prints
Ta-da! A pretty and festive wreath...I think I am going to add a real red bow on the top to complete it and wrap it up as a gift. Hope you enjoy and have fun making one too!
P.S. one great tip I learned- we got a little paint on the canvas where we didn't really want it...I waited until it dried and it washed right off with a damp towel (we used- Crayola's washable finger paints)

Tuesday, November 29, 2011

Make your own rock candy

When I was little my mom used to do a lot of science projects with me and my sister.  One of my favorites was growing my own crystal candy (or rock candy).  I couldn't wait to wake up in the mornings and see how much my crystals had grown.  Then I couldn't wait to eat them after I thought they had grown enough!
I was shocked to find out that when I talked about doing a rock candy tutorial for our blog, both Lindsi and my husband had never heard of rock candy, let alone made their own!  Seriously, who's never heard of rock candy?? (*Lindsi edit- butting in...I have heard of rock candy before...just never heard of making your own)
Here's what you'll need to make your own rock candy (FYI--I doubled the recipe to make 2--one for each of my girls):
  • 1 cup of water
  • 3-4 cups of table sugar
  • clear glass jars
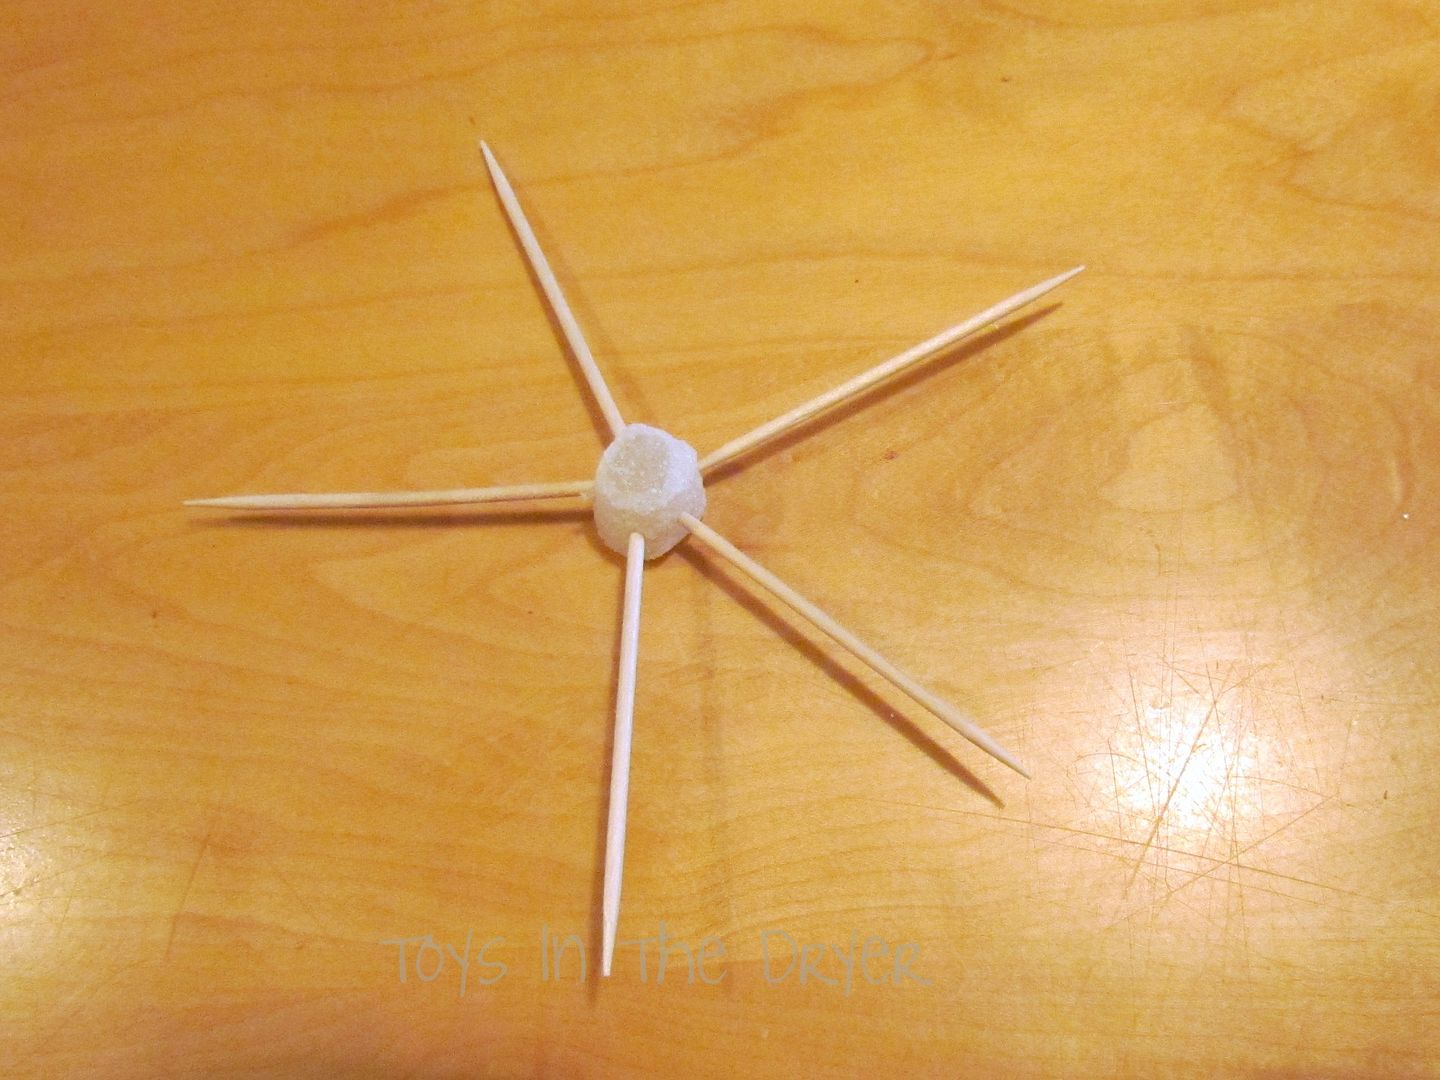
  • wooden skewers (cut the pointy tip off)
  • clothes pins or something similar
  • food coloring (optional)
1)  Boil the water.
2)  Slowly add sugar small bits at a time.
3)  Continue to stir in sugar until no more will dissolve despite more stirring.  Your solution will be thick and syrupy.
4)  Dip your skewer into the solution then into more sugar.  Tap off any excess sugar to that just a small amount coats the skewer.  (This step helps to jump start crystal growth)
5)  Put a bunch of drops of food coloring at the bottom of your glass jar (optional) then fill them 3/4 of the way full with solution.  If you are making only one color of crystals you can add the food coloring to the solution before you pour it into the jars.  The more food coloring you add the stronger the color will turn out.  One or two drops won't be enough.  I added 4-6 drops.
6)  Gently place your skewer into the solution to that it sits about 3/4 of an inch from the bottom.  Try not to let a bunch of sugar crystals fall off the skewer or let the skewer touch the bottom of the jar.  Use the clothes pin to make it sit in the middle of the jar.  If it touches the bottom or the sides of the jar, the crystals will grow on the jar and not the skewer.
 day 1, day 4, day 7
7)  Set your jar(s) somewhere where they won't be disturbed.  Your crystal rock candy will grow over the next 4-7 days!
8)  When you think your crystals have grown enough, gently use a knife to break up the top layer of crust.  Make sure not to hit your rock candy while you are breaking up the crust.
9)  Pull out your rock candy and let the excess solution drip off.
10)  Set aside to let dry for later or enjoy right away!

*Just a reminder, you are working with boiling water so make sure you supervise your children closely!

Did you ever eat rock candy as a kid?

Monday, November 28, 2011

Festive pillows

I loved this idea so much that I had to share with our faithful Toys In The Dryer readers too (It was originally posted on my personal website).

Yup! My crafty itch has been bad this year. Maybe I'm trying to drown myself in projects? Who knows?
Want to know how I turned three BORING blah-zay pillows into cute Christmas pillows? Here is how!
Step one: Take any blah pillow you have around the house, or go to the store and buy the ugliest one you can (believe me the uglier the cuter they turn out)
how to make Christmas pillows yourself
I added the red zig zag stitching to each of my blah pillows for a little added flare.
Next I made three rectangle swatches to attach to the pillows (notice I added the same red zig zag stitch to these to pull it all together)
how to make Christmas pillows yourself


 Then I dug through my Christmas cookie cutters to find three that I liked best and taped them using painters tape to each swatch...like sew (ha ha ha pardon the pun). I let my son pick them out. He helped attach the tape too!
how to make Christmas pillows yourself
 Easy peasy, right? Then get out your paint color of choice and a paint brush (please note- don't learn from my mistake by using a sponge, use a brush...the sponge left the line really unclean and being the perfectionist I am I had to re-sew a new swatch). I think the part that was most fun was letting my son help me paint them in. He really got a kick out of it!
how to make Christmas pillows yourself
Paint and fill in each cookie cutter shape with the paint you chose (I used acrylic paint- I like it and that's why)
how to make Christmas pillows yourself
 Set the swatches aside to dry then attach to blah pillows and viola, now you have cutesy pillows. I added a little bell to the corner of each swatch for a little jingle (but no money came out- ha ha ha). Then sit back and enjoy! My total cost for this project was $1.97 (for 1 yard of fabric- I had the pillows, paint, thread and cookie cutters). We gained three cute pillows and a fun memory we shared!
how to make Christmas pillows yourself

Friday, November 25, 2011

Andrew Shue and Mom.com

*Due to the Thanksgiving Holiday there will be no Fun Stuff Friday linky today we will see you next Friday!*

On Tuesday, November 15th, Jamie had the opportunity to meet the actor Andrew Shue (Billy Campbell from Melrose Place) at the Minneapolis Suburbs Mom.com Premier Party.  Unfortunately, Lindsi was unable to attend the party due to a death in her family.  She missed a really fun and informative time!


Ok, so what is Mom.com, why were they having a premier party, how is Andrew Shue involved, and why were we invited??  Lets start with Mom.com and Andrew Shue...

Years ago, Andrew quit acting to spend more time with his family and pursue other adventures.  He eventually co-founded Cafemom, one of the largest social networking sites for moms in the US.  Cafemom is now off-shooting into another site called Mom.com...

If you go to the Mom.com website now, it looks like your average daily deals site.  However, the deals on the site have actual local moms acquiring them, standing behind them and promoting them.  Plus, Mom.com is growing!  The daily deals will end up being the icing on the cake to so much more! 

Mom.com will grow into three main things: commerce, content, and community.  It will be similar to it's parent, Cafemom, but will be scaled down and focused to small areas such as the Twin Cities suburbs where we live.  The whole idea behind Mom.com is local community--supporting local businesses, local gatherings, keeping up with local current events, giving to local charities, and growing and strengthening the local community.  Mom.com launched with daily deals to begin earning revenue so they could start giving back to the community.  The rest of the stuff will launch over the next few months.

Micaela, Tracy, Jamie, Samara, Jen

How are Lindsi and I involved?  We met a gal named Natalie at a local blogging event.  She was recruiting bloggers for the Mom.com Founder's Club.  The founders club people will help tell Mom.com what's hot in the area, what businesses they should promote, and what charities they should support.  In chatting with Natalie we also discovered that Mom.com is looking for a few bloggers to blog for them.  Lindsi and I are now working with Mom.com to (hopefully) become one (or two, in our case) of their bloggers!  As part of the Founder's Club and one of the blogger recruits, we were invited to the Minneapolis Suburbs Premier Party for the official kick-off/launch of the site!

There you have it...what Mom.com is, why they were having a party, how Andrew Shue is involved, and why we were invited...

Go ahead and check them out for yourself.  You won't be disappointed with the deals, and you can eventually say, "I was there when it all started..."

Thursday, November 24, 2011

Happy Thanksgiving!

Happy Thanksgiving from our families to yours!


Thankgiving Table 2
Photo courtesy of Wondermonkey2k
May your tables be filled with wonderful blessings!


Our Fun Stuff Friday linky was a huge success last week!  
However, because we are spending time with our families (and we hope you are too) there will be no Fun Stuff Friday linky tomorrow.  Instead, enjoy a brag post about Andrew Shue and Mom.com.  
We'll see you on Monday for our regular schedule!

Wednesday, November 23, 2011

Scents of the season

Strapped for cash? Want a homemade present? Don't have a lot of time to invest on a handmade craft? Love the smell of the season? Then this is the craft for you! I used to make these when I was little with my grandma. She's the one I told you about who always had some fun, crafty, creative idea. You too can make your own scented holiday decorations in just a couple of easy steps!

Here is what you will need:
1 1/2 cups ground cinnamon
1cup applesauce
1/4 cup white school glue


Combine the ingredients in a large bowl and stir well. Then cover and let stand for 1 hour.
apple cinnamon air fresheners
Roll out the dough so that is approximately 1/4-1/2 inches thick. (Tip- if you use your hand you will get the dough to compress better and it will be a more solid appearance than if you use a rolling pin)
apple cinnamon air fresheners
Have your child choose the cookie cutters he or she wants to use to cut the dough and place the cut outs on a piece of wax paper.Use a straw (a straw from a juice box is a great size straw to use) and gently cut out holes near the top of each ornament to string them later.
apple cinnamon air fresheners
Let the cut outs dry for approximately 3-4 days. Make sure you flip them over a few times a day to allow even drying. You will know they are fully dry by a few things: they will appear lighter in color, they will be slightly smaller and they will be hard. (Tip if you look at the two bells on the right side of this photo- the top bell was flattened using a rolling pin and the bottom bell was flattened using my hands...it's up to you how you want it to look)
apple cinnamon air fresheners
Once they are completely dry cut some ribbon to the length you wish and string them through the holes you made with the straw. Hang and enjoy! I suggest placing them in a plastic bag for storage through the year, this keeps them fresh and smelling great come next year.
apple cinnamon air fresheners
Something to note- please make sure you tell your husband, significant other, or older kids ahead of time that these are not cinnamon cookies for them to enjoy. My husband smelled the cinnamon like a blood hound and asked when they'd be ready to eat! I assured him that glue and cinnamon doesn't taste very good.

Have you ever made your own holiday ornaments, potpourri or presents?

Tuesday, November 22, 2011

Candy Snowflakes

In honor of our first snowfall of the season this past weekend...

Candy snowflakes- easy, cheap, tasty and cute! All you need are a bag of spice drops and some toothpicks!

Select one spice drop as your center and insert 5 toothpicks into it. Remember it's five not six....snow flakes have five points (and if yours have six you should play the lottery because dang you are lucky!)

Attach the colors of your choice to each toothpick (usually 3 fit nicely)

Once you have filled each toothpick it's usually acceptable to dig in and eat as many as you can handle. Have fun and enjoy!

Monday, November 21, 2011

Four Thanksgiving Activities for Kids and Adults


It's Thanksgiving Day and you've got a house full of kids and adults...how do you keep them all entertained?  Try these four activities that will get them interacting together:

Word Search/Memory Game:

1)  Make a list of of Thanksgiving related words.  How many words depends on the number of adults you think will be willing to participate.  Number the words 1-??
2)  When your guests arrive, give each adult a word from the list along with what number it is plus the following word from the list.  Give each child a piece of paper and pencil and word #1.
3)  Throughout the day/evening the children will search for all the words in order by asking the adults to act out the word he/she (the adult) was assigned.
4)  The children will ask the adults to act out words until they find #1.  That adult will give them word #2 and the children will have to hunt for the adult that acts out word #2.  That adult gives them word #3 and the process is repeated until the children have found all the words.

Pictionary:

1)  Make a list of Thanksgiving related words or phrases.  Cut them apart and put them in a container.
2)  Grab some sheets of paper and some pens.
3)  Split up your guests into two teams trying to have an equal amount of adults and kids on both teams.
4)  The team with the youngest player goes first.
5)  A person from that team picks a word from the container and must draw it for their team to guess before the 2 minute time limit runs out.
6)  The opposite team keeps track of the time and may take one guess at the word if the drawing team fails to guess it.

Charades:

Same rules as Pictionary above but the words are acted out instead of drawn out.


Turkey Talk:

I discovered this fabulous activity from our Fun Stuff Friday linky (you'll find lot of Thanksgiving crafts and other stuff there)!  Please visit Dixie Delights for this great questions around the table activity!

Hey, we've now added four more Thanksgiving activities for kids and adults!

What do you do to keep your guests entertained during the holiday events at your house?

Friday, November 18, 2011

Introducing Fun Stuff Fridays

Fun Stuff Fridays

We have had so much fun with activities, crafts, tasty treats, and enjoying our children we thought it would be fun to see the things you have done with yours! We hope you will share in the linky below so that we can share in your fun! We're excited to see what you all have been up to! Make sure to share the linky with others.

Thursday, November 17, 2011

Glittery Snow Globe

Here is a "nearly free" and fun project. This is one that I would say to let the parents do because of the mess involved. I use this when my kids are sick in bed, they will sit and look at the glittery globe for hours (OK minutes, but in kid time that is a long time). Let me preface this with "yes, I know snow globe usually equals winter, but this is a great "sick kid" activity." My son recently had surgery and I made one of these for him to play with in the hospital...he loved it!

make your own snow globe

Here is what you need
Baby food jar or a water bottle if you want a big one
Glitter
Mineral oil (or Baby oil)
One drop of food coloring
Super glue
make your own snow globe

Simply sprinkle a little glitter in the jar, fill the jar half way with mineral oil and the other half with water, add one drop of food coloring, glue the cover on tight and hand it over to your sick kiddo. They'll love to watch the oil and water try and mix and to see the glitter bounce around.
make your own snow globe

Wednesday, November 16, 2011

How to make rainbow fish sun catchers using old CDs

We all have old CDs laying around that, for some odd reason, we haven't gotten rid of.  If not, go through your kids' CDs, I'm sure you'll find some scratched, unusable ones in their collection!  What do you do with those CDs (besides throw them away)?  You make stuff out of them!


I'm not a fan of cutting up CDs because they are full of heavy metals and once cut, the metals can leech out of them.  I prefer to do crafts that do not require cutting them up and risking heavy metal exposure for me and my kids.  Rainbow fish sun catchers are perfect! 

You'll need:
  • Old CDs--2 per child
  • Water soluble markers
  • Coffee filters
  • Super glue
  • A spray bottle of water
  • Scissors
  • Small piece of paper
  • Wiggly eyes
  • String/yarn/fishing line
  • Cookie sheet
Step 1)  Have your kids color all over the coffee filters with the markers.

Step 2)  Put the colored filters on the cookie sheet and spray them with the water so that the colors bleed.  (The cookie sheet keeps the water and bleeding markers off the table and contained)  Make sure not to dilute your colors too much.  A small amount of water is all you need.  If you don't have a spray bottle, you can dribble water onto the filters with your fingers.


 Step 3)  Let the filters dry for a while or use a hair dryer to speed up the process.

Step 4)  Once the filters are dry fold them in half.  Save one for the tail, cut the other one down the center for the fins.

Step 5)  Take one of the half coffee filters and fold it in half.  Then fold it back and forth like a fan.  To the same to the other half filter.  Take the full filter, fold that in half (if you haven't already) and fold that back and forth like a fan also.

Step 6)  Glue the fins to the printed side of the CD.  Cut a mouth out of a small amount of paper and glue that to the printed side of the CD as well.  Loop your string and glue that to the printed side if you want as well (I forgot to do that so I had to do it later--see below).

Step 7)  Glue the other CD printed side to printed side on top of the first CD.  Make sure to press hard as the fins will be thick.  Add the wiggley eyes (one on each side).


Step 8)  Add your string through the center hole (if you didn't add it before you glued the CDs together) and hang!  If you hang it in the window and the sun hits it just right, it becomes a sun catcher and casts rainbows on your wall!

What crafts have you made out of old CDs?

Related Posts Plugin for WordPress, Blogger...