Thursday, February 21, 2013

Easter Fun With Carrots and Dip

Need a fun way to encourage your kids to eat their veggies?  This cute presentation is sure to spark their interest!
Tottie couldn't wait to eat her carrots and dip after I showed her these potted cuties.  To make your own you'll need:
  • Mini terracotta pots
  • Baby carrots
  • Parsley
  • Veggie dip
  • Medicine cups
  • Toothpicks
  • Scissors
 photo Funcarrots4.jpg
Start by filling your medicine cups with your veggie dip.  Put your medicine cups in the terracotta pots.
 photo funcarrots3.jpg
Use a toothpick to poke a hole in the top of each carrot then insert a small piece of parsley into that hole.  
Last, you'll "plant" your carrots in the dip.  If you've filled your medicine cups high enough the dip will spill over the edges when you plant your carrots.  The spilled dip helps to hide the cups.
 photo funcarrots5.jpg
Watch your kids enjoy eating their veggies!

Tuesday, February 19, 2013

Flash Pals--A Unique Easter Basket Gift

Looking for something unique and fun to put in an older child's Easter basket this year?  How about FlashPals!  These super cute USB drives will have all their friends talking!

FlashPals are the creation of Doug Stienstra who's girlfriend asked for a "cute" flash drive for her birthday.  When he couldn't find one he liked, he made one.  His creation was such a hit with his girlfriend and her friends that he turned it into a full-time business!  What's better, is that FlashPals has partnered with the world's leading giraffe organization, the GCF, to support their efforts to protect giraffes through sales and donations, so now FlashPals save data AND the wild.

Each FlashPal represents a real animal species that faces real threats and each has a name.  Jamie was lucky enough to review Zena the Zebra.
 photo FlashPals.jpg
Zena came in the cutest little box.  When I opened it, I was instantly in love!  Here was this super cute zebra flash drive in this awesome clear storage tube.  I was a little worried about the construction at first, but after tugging at the seams a bunch, and giving her to my girls to play with, she held together just fine.  (I wouldn't recommend purposefully trying to pull your FlashPal apart, but to give it a fair review, I did.)  She looked adorable sticking out of the side of my computer and my girls were excited when her "heart" lit up to let us know she was working.  She's got 4GB in that body of hers so there's plenty of room for all my storage needs.

I really only have one (minor) complaint.  Zena has a lot of white on her so if I want to take advantage of her nifty key chain attachment, I run the risk of getting her dirty.  I don't want to get her dirty--she's too cute!  According to the tag on her (which I cut off for general use) she is surface washable but I'm still not convinced I want to grub her up.


Lindsi received Jack the Giraffe in the mail. When I saw the little tube he came in I thought "well, that sure is adorable!" Jack came to our home with plenty of storage in his long neck, 4GB to be exact. This is a great deal of storage for such a little guy. I used Jack to store my photos from 2012 on it. I loved how when Jack the Giraffe is attached to my computer (or my sons) a little fact sheet popped up about Giraffes. Just some fun information for you and your kids from the FlashPal info sheet:

In 1999 there were over 140,000 giraffes in the wild, now there are less than 80,000. The color of a giraffe's tongue is BLACK! Giraffes have very big hearts- they weigh up to 25 pounds!!! And my personal favorite: The neck of a giraffe can be over 6.5 feet long!

Once Jack the Giraffe was plugged into our computer his BIG HEART lit up. This is a great idea because it helps my son know it is working. A great "visual" tool for a kiddo. I also loved how each FlashPal is attached to a clip that allows you to keep it on your key chain, making it portable and assuring it's with you whenever you might need it.

If you check out FlashPal's website you will see that there is an option to have them preloaded with information that would be fantastic for school! We hope you will check out FlashPals and fall in love with them like we did. This is a sponsored post written and expressed by us. FlashPals provided Jamie and Lindsi with their own FlashPal to use and review.

Monday, February 18, 2013

Frozen Bubbles

We've had a cold winter this year in Minnesota. Though most of the time we keep our kids indoors when the weather is well below freezing, there are times when sub 0°F can be a lot of fun!
frozen bubbles
Take bubbles for example...they are a summertime or indoor activity, correct?  No!  Take them outside when it's below freezing and watch what happens!
frozen bubbles 4
The colder the temp outside the faster the magic happens, however, don't go outside when it's too cold or you won't be able to do it for long. Also a bit of a hint, make sure it's pretty calm outside. Any breeze and your bubbles will fly away before you get to play with them.
frozen bubbles 2
Don't have bubble solution or a bubble wand? No problem! Make the solution out of dish soap and water. Use a straw as a wand.
frozen bubbles 3
Experiment by blowing a bubble, letting it freeze, then taking it inside. What happens?

Freezing bubbles was a ton of fun with my girls and I'm sure your kids will have just as much fun!

Friday, February 15, 2013

Cadbury® Creme Eggs® Milkshakes--Pinned it, Did it!

Easter is one of my favorite times of year for candy because that's when Cadbury® Creme Eggs® come out.  I am seriously addicted to these eggs!
 I was browsing Pinterest last Easter and came across Cadbury® Creme Egg® Milkshakes.  OMG, yum!  I at first thought that this link would lead me to a recipe that made milkshakes that tasted like the best little eggs ever, however, these milkshakes are made with them.

They are nothing more than Cadbury® Creme Eggs®, vanilla ice cream, and a little bit of milk blended together.  If you want to get all technical about ratios how how much goes into the shakes you can visit the original site recipe.
Though simple, this milkshake is to die for!  Super sweet, however, so I wouldn't recommend drinking a glass the size of what they made.

What is your favorite Easter candy?

fall cookies
Click on the button above to learn more about Pinned it, Did it!

Thursday, February 14, 2013

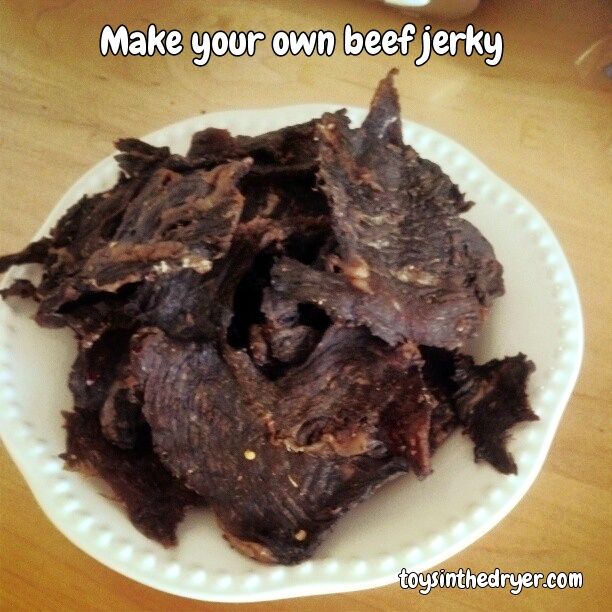
Homemade Beef Jerky


We love beef jerky in our home and we tend to make it weekly. It's really easy to do and MUCH MUCH cheaper than buying it in the store. You do NOT need a food dehydrator to do it either. Because we make it so often we did invest in a food dehydrator, but again it is certainly not required.


You will need:
a large beef roast (sliced- you can slice it yourself or have the butcher do it for you)
1 cup soy sauce
3/4 cup Worcestershire sauce
1 T red pepper flakes
1/2 tsp liquid smoke
1/2 tsp Cayenne pepper
1 tsp black pepper
3 T honey
3T maple syrup
a pinch of garlic powder


Place your sliced beef into the mixture of marinade and let set for a MAXIMUM of 15 minutes (if you leave it in the marinade longer the taste will be incredibly strong)

Lay the beef out on a cookie sheet and place in the oven at the lowest temperature setting (usually 125-150 degrees F) and leave over night. The beef will dehydrate and dry up by morning and you will be left with some awesome homemade beef jerky. Enjoy!
Related Posts Plugin for WordPress, Blogger...