Sunday, February 5, 2012

Woven Hearts

Welcome to day 5 of Toys In The Dryer 14 Days of Valentines!
From February 1-14 we'll be doing non-stop Valentine's posts to celebrate this lovely holiday.


Today we're doing woven hearts.  I showed the above photo to a few friends of mine and I got the same response each time--"I remember making those!"  Some made them out of felt, others made them out of paper like I did with my girls.  FYI: felt is MUCH easier to work with because it doesn't tear.  Here's what you'll need to make your own woven hearts:


  • Felt or paper of two different colors (we used paper because I was too lazy to get more felt) 
  • Scissors
  • Glue (optional)
The steps below are the same if you use felt or paper.


1)  Cut a long rectangle out of each color paper making sure they are the same size.

2)  Fold the rectangles in half, put them together then round the unfolded edge corners.


3)  Still folded, line up the two rectangles at a 45 degree angle.  Note (make a light line or mark) where they cross each other for the next step.  


4) Still folded, cut slits from the folded edge up to the mark you made in the step above.


5) This is where it gets a slight bit tricky...weave the two folded rectangles together at a 45 degree angle.  Weave the strips through and around each other.  Try not to rip your paper as you do this.


6) Glue a handle onto the heart to make a basket or glue the heart onto another piece of paper to make a card like Nutty did.


Did you make woven hearts in school when you were a kid?
Click on the button below to see all of our 14 Days Of Valentines posts!
ToysInTheDryer

Saturday, February 4, 2012

Wax Paper Hearts

Welcome to day 4 of Toys In The Dryer 14 Days of Valentines!
From February 1-14 we'll be doing non-stop Valentine's posts to celebrate this lovely holiday!

 wax paper hearts

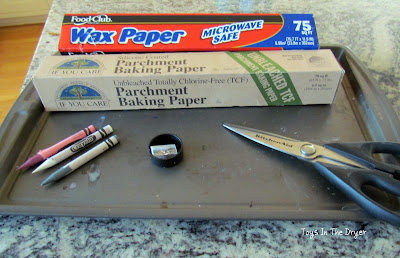
Wax paper hearts are a combination activity and craft. This only involves a few items too!

Here is what you will need:
wax paper hearts

Wax paper
Pencil sharpener
Crayons
Cookie Sheet
Parchment paper (or construction paper will work too)
Scissors and string

Remove a long sheet of wax paper from the container and place it on the cookie sheet.
Have your child (or help them) take Valentine's colored crayons (white, pink, red, a little gray) use the pencil sharpener to create crayon shavings.
wax paper hearts

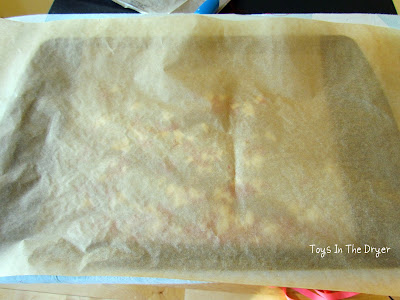
Spread the shaving out all over the wax paper.
Fold the paper in half.
wax paper hearts
Cover with parchment paper.
wax paper hearts

*This part is for the adults* Iron on the lowest setting until the crayon shavings are completely melted.
wax paper hearts

Set the wax paper aside to cool completely.
wax paper hearts

Use a scissors to cut out heart shapes from the wax paper.
Attach a string and hang from a window. A perfect amount of color to cheer up any window from the gloomy and gray look of winter, don't you think? (My son had a great idea too---you could also hang them from the mantle of a fire place for a festive flock of hearts!)
wax paper hearts


Click on the button below to see all of our 14 Days Of Valentines posts!
ToysInTheDryer

Friday, February 3, 2012

14 days of Valentine's Fun Stuff Fridays (#9)

Welcome to day 3 of Toys In The Dryer 14 Days of Valentines!

Welcome to Fun Stuff Fridays.  Wanna know more about our linky? Click on "Fun Stuff Fridays" above, then "about". Can't wait to see your amazing submissions this week! Feel free to submit as many ideas as you want over that time. And remember- spread the word! 

Our joint favorite pick was the Valentine's Wreath submitted by School House Scraps. This is one of those "duh, why didn't I think to do something cute like this?" posts.  Absolutely adorable AND super easy.  Cheap doesn't hurt either! We added this to our Pinterest board for inspiration!

Jamie's favorite pick from this past week was the Chocolate Covered Fluffernutter Hearts submitted by Homegrown Beanes. As her post says, "Do you ever have one of those days where you just need a little pick me up?"  Um...these would definitely pick me and the rest of my family up!  All I can say is, "YUM"!

Lindsi's favorite pick from this past week was Scratch- Off Valentines Countdown submitted by Destination Craft. I never knew you could make your own scratch-offs and I am so excited to see this! This will be something to "keep in my back pocket" for future use. My kids would love this!

Fun Stuff Fridays


Fun Stuff Fridays

.
Click on the button below to see all of our 14 Days Of Valentines posts!
ToysInTheDryer

Thursday, February 2, 2012

Surprise Valentines

Welcome to day 2 of Toys In The Dryer 14 Days of Valentines!
From February 1-14 we'll be posting non-stop Valentine's posts to celebrate this lovely holiday.

Today we're making Surprise Valentines!  I hope your kids have just as much fun as mine did while making these!


Here's what you'll need to make Surprise Valentines:
  • Cereal boxes or some other kind of thin cardboard
  • Paper in Valentines colors
  • Glue
  • Scissors
  • Candy
  • Tape
Step 1)  Cut your cardboard and some paper into pieces approximately 3 x 3 inches.  You'll need 2 pieces of cardboard and 2 pieces of paper per Valentine.

Step 2)  Glue the paper to the colored side of the cardboard to cover it up.  Set them aside for later.

Step 3)  Take an 8.5 x 11 in piece of paper and cut it evenly into 4 strips the long way.  (Yes, I realize there's only 3 strips above.  My daughter was using the 4th strip.)

Step 4)  Accordion fold each strip into 8 sections.

Step 5)  Cut a half-heart out of the folded accordion making sure you leave an uncut edge on the unfolded edge.  

Step 6)  Unfold the hearts and glue half of a heart end onto one of your cardboard pieces.  You can glue it to either the paper or the cardboard side depending on how you want the front of the Valentine to look.  Glue the other half-heart end to another cardboard piece making sure you glue to the same side of the cardboard as you did your first end.
 
Step 7)  Write words on your hearts such as "friend" and "smile" or "valentine" (whatever you want!)

Step 8)  Fold the hearts back up between the two cardboard pieces.

Step 9)  Decorate the front of your Valentines however you want.  Say stuff like, "You Make Me..." (inside Smile) or "You're My Best..." (inside Friend) or "You're The Best..." (inside Valentine).  Whatever sayings you want!


Step 10)  Tape a piece of candy to the front of the Valentine making sure there's a small amount of tape that wraps around to the back piece of cardboard.

When the Valentine recipient takes the candy off of the front of the card, the surprise will be that the hearts will unfold!

Click on the button to see all of our 14 Days Of Valentines posts!
ToysInTheDryer

Wednesday, February 1, 2012

We Love You Because...


Toys In The Dryer


Welcome to Toys In The Dryer 14 Days Of Valentines! 
For the next fourteen days straight (including Saturdays and Sundays) we'll be posting Valentines related posts!  Even our Fun Stuff Fridays linky party will be Valentines focused!  We'll be going a little off of our usual schedule during this time, but we hope you enjoy our tribute to this lovely holiday.


Show your kids that you love them and boost their self esteem with these easy "We Love You Because..." message boards.


I have to admit, this is another one of our Pinterest inspired posts.  I found this husband geared Love Message Board tutorial and totally thought this would be great for my girls!  I'm always looking for unique ways to show them that I love them.

These are so easy to make!  In fact, they are so easy, I didn't feel the need to take step-by-step photos.  I'm pretty sure you're smart enough not to need a visual...


1) Grab your computer, some paper, some scissors (optional), an 8x10 photo frame, and make sure your printer has ink.

2)  Print out the words "We Love You Because..." (or I Love You Because... if you are a single parent) in whatever font and color you want.  Make sure to align it toward the top of the page so you have room to write on the bottom.  Add a border or other embellishments if you want.


3) I cut my white paper slightly smaller and mounted it on a background piece of paper to add some interest.  This is completely optional.

4) Put your paper in the frame and use dry erase markers to write messages on it every day!

Nutty's favorite color is pink so I made her board pink.  Tottie's favorite color is purple so I made her's purple.  I didn't make them any more different or they would have gotten mad because they have to have everything the same!


Click on the button below to see all of our 14 Days Of Valentines posts!
ToysInTheDryer
Related Posts Plugin for WordPress, Blogger...